Baking Day with my Friend!


On baking day this week I did a very fun thing and spent the day with a great friend and we did the baking project together.  I have not had that much fun in a long time.  It was so nice to have another person’s hands and brain to help with making something new.  It was also great as this recipe had several breaks where things had to sit for an hour, so we were able to sit and have coffee, scones (homemade and lovely) and chat.  We also took some time to look at some great craft ideas online that I might have to showcase here in the near future.  I follow a blog called Simple Mom and she posted this link last week.  I love anything made with pumpkin so I knew I would have to make this recipe for Pull-Apart Cinnamon Sugar Pumpkin Bread with Buttered Rum Glaze!   I know, you are all excited because you just read rum in the title.  Unfortunately, we didn’t have any rum on hand (I know who doesn’t have rum on hand) so we used vanilla, but it was still amazing.  This is one of those recipes that you need to make sure you have plenty of time and it is a good idea to read through the entire recipe before you start. The toughest part of this recipe would be browning the butter.  Make sure to take it slow and watch/stir it constantly.  There is a fine line before it is browned and then there is an even finer line before it is burnt.  You don’t want that.  I’m glad I didn’t have to do this part of the process.  There are other great pointers within the recipe so look for them when you are making this lovely bread.  I have heard this is really good in the morning with a cup of coffee!

I have these really great pictures of the finished product thanks to my friends amazing talent with her camera.  She has started giving me pointers so maybe some day my pictures will be this beautiful.  Happy Baking!

Cheese and Quinoa Stuffed Red Peppers – For Erica!

This is a great new vegetarian dish that I made a few weeks ago and posted a picture on Facebook and received many requests for the recipe.  I finally made it again last week and took lots of pictures to show you the process.  I even got my kids to eat this dish but they picked out the mushrooms.  I still figure they got a pretty good dinner with lots of good veggies!  I found this recipe in Shape magazine and the recipe is actually to make 1 pepper.  I add enough to the recipe to make 4 or more peppers.  I tried to find this recipe on Shape’s website but had no luck so I will just write it out for you.  🙂  I’ll put a more condensed version of the recipe at the bottom of this post to make it easier for you to print out.

Cheese and Quinoa Stuffed Red Peppers

Serves:  1

Prep Time: 5 Minutes

Total Time: 25 Minutes
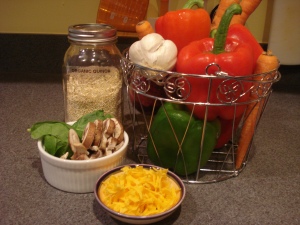
Ingredients:

1/4 cup dry quinoa

1 large red bell pepper

1 tablespoon extra-virgin olive oil

1/4 cup minced red onion

1/4 teaspoon minced garlic

1/4 cup shredded carrots

1/4 cup baby spinach

1/4 cup sliced white button mushrooms

1/2 teaspoon salt free italian herb seasoning

1/4 cup finely shredded cheddar

Preheat oven to 350 degrees F.  Place quinoa (I always rinse my quinoa prior to cooking.  It can have a funny taste if it isn’t rinsed) and 1/2 cup water (I use vegetable broth to give it more flavor) in a small saucepan and bring to a boil.  Reduce to a simmer, cover, and cook until all water is absorbed, about 5 minutes(may take longer depending on your quinoa) .  Set aside and keep covered.

While quinoa cooks, use a sharp knife to cut the top off the pepper and remove the seeds and membranes;  Keep the pepper whole.  Set aside.


I did a green pepper in this batch for my daughter who prefers green peppers over red.


Heat a medium skillet on medium-high; add olive oil.  Add onion and saute until translucent, about 2 minutes.
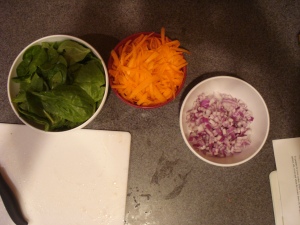


Add garlic, carrots, spinach, mushrooms, and the seasoning (I did not use seasoning, I just used a little salt and pepper) and saute until vegetables are slightly tender, about 4 minutes.


Transfer sauteed vegetables to a bowl.  Mix in cooked quinoa, and gently fold in cheddar (or whatever kind of cheese you have around the house).
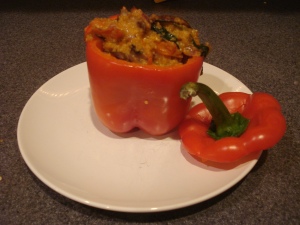


Fill pepper with the mixture.  Place in a baking dish and bake uncovered for 15 minutes or until pepper is slightly charred.  Serve warm or at room temperature.


I hope that you and your family enjoy these peppers as much as we do!  I am really enjoying cooking with quinoa so look for more recipes to come using this wonderful food!


Cheese and Quinoa Stuffed Red Peppers

Serves:  1

Prep Time: 5 Minutes

Total Time: 25 Minutes

Ingredients:

1/4 cup dry quinoa

1 large red bell pepper

1 tablespoon extra-virgin olive oil

1/4 cup minced red onion

1/4 teaspoon minced garlic

1/4 cup shredded carrots

1/4 cup baby spinach

1/4 cup sliced white button mushrooms

1/2 teaspoon salt free italian herb seasoning

1/4 cup finely shredded cheddar

Preheat oven to 350 degrees F.  Place quinoa and 1/2 cup water (I use vegetable broth to give it more flavor) in a small saucepan and bring to a boil.  Reduce to a simmer, cover, and cook until all water is absorbed, about 5 minutes.  Set aside and keep covered.  While quinoa cooks, use a sharp knife to cut the top off the pepper and remove the seeds and membranes;  Keep the pepper whole.  Set aside.  Heat a medium skillet on medium-high; add olive oil.  Add onion and saute until translucent, about 2 minutes.  Add garlic, carrots, spinach, mushrooms, and the seasoning and saute until vegetables are slightly tender, about 4 minutes.  Transfer sauteed vegetables to a bowl.  Mix in cooked quinoa, and gently fold in cheddar.  Fill pepper with the mixture.  Place in a baking dish and bake uncovered for 15 minutes or until pepper is slightly charred.  Serve warm or at room temperature.

Apple Brown Betty

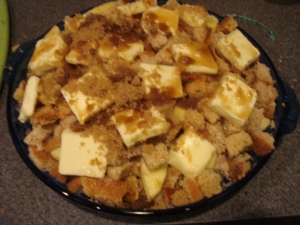
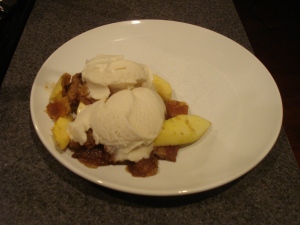
For my last “Wednesday” baking project I made Apple Brown Betty on a Friday!  Some weeks just don’t work out how you plan.  You just have to go with the flow.  Since I had some apples lying around from our little apple picking trip I figured I should bake something with them.  I had never made Apple Brown Betty, so I decided to give it a try.  I went online and googled it and one of the first things that came up was a recipe from The Pioneer Woman.  I am now in love with her and her blog.  Please check it out!  The recipe was very simple and I really enjoyed the instructions!  I actually didn’t use as much butter as the recipe called for but I thought that it still turned out very good.  This is a great simple recipe that you can throw together when you have company and then it comes out nice and warm and you add a little vanilla frozen yogurt, ice cream or soy cream, whatever you choose!

This is what the dessert looked like just before it went into the oven.


This is the yummy goodness when it came out of the oven!


And here we are with a little Trader Joe’s Vanilla Soy Cream (very tasty)!

Breakfast for Dinner…YUM!!!!

I love having breakfast for dinner!  It is one of my all time favorites.  I think it is because I love sweet breakfasts so it feels like dessert and dinner all mixed into one!  Today I tried Cinnamon Crepes from Shape Magazine (Nov. 2008).  This was a new breakfast item for me as I have never made crepes.  This recipe was very straightforward and easy to follow.  I didn’t use as much cinnamon as it called for and that was a mistake as it did not have as strong of a cinnamon taste as it should have.  Make sure you give yourself enough time to make these as the batter is supposed to sit in the frig for 45 minutes.  My 10 year old tried them and her response was “they aren’t great but they are edible”.  So there is the kids point of view.  I really enjoyed them and liked the cold frozen yogurt as a change.

My family spent this morning at Skytop Orchard in North Carolina picking apples and having fun!  Stay tuned later in the week for some sort of yummy apple dessert!

Happy Labor Day!


Baking Day!

I have made myself a little resolution since my kids went back to school two weeks ago to try to bake on Wednesdays.  On their first day of school I made snickerdoodles and last week I made a loaf of banana bread and a loaf of pumpkin bread.  One for each of the girls because they, of course, don’t like the same kind.  Today I decided to do a little project with the kids.  I made my Mother’s Sweet Christmas Wreath Bread (minus the Christmas and wreath part) and instead we made a Turtle!  I got the turtle idea from a magazine.  This could be made with any kind of bread dough.  After you have kneaded the dough and it has risen once.  Punch it down and make the pieces for the turtle.  You will need the body, a head, 2 arms (do turtles have arms?), 2 legs and a little tail.  Assemble the pieces on a greased baking sheet.  You can make a criss cross pattern with a knife on the shell and use raisins for eyes.  Cover the dough and let it rise again (approx. 30 min.).  Prior to baking make an egg wash by whisking an egg white.  Brush the dough lightly with the wash and then bake according to your bread directions. 

One of the things I will do with this blog is be very honest about how things come out.  The turtle bread is first of all adorable.  Kaylee and I had a good laugh at how big his head is.  The bad news is I decided to try some new things with the bread recipe.  Sorry, Mom!  I decided to use unbleached white whole wheat flour instead of all purpose flour.  The bread turned out, but it didn’t have the same texture and sweetness that it usually does.  You live and you learn.  Kaylee wanted me to promise never to make it without the all purpose flour.  The other problem I had with this might have been due to the flour or the shape of the turtle but I cooked the bread the same time I usually do and it looked done when I took it out of the oven.  Unfortunately, a short while later most of the turtle back caved in.  😦  He was not done cooking.  I probably could have made two smaller turtles and that would have helped with the cooking time also.  This was a really fun project and I will definately do it again.  Sometimes I need to remember to not mess with a good thing, like my mom’s recipe.

Sweet Christmas Wreath Bread (or as my Mom’s note says “Anytime wonderful bread”!) – Dora Olsen

1 cup sugar

1 tsp salt

2 pkgs yeast

9 cups flour (all purpose white)

2 cups milk

1 cup butter

3 eggs

Combine first 3 ingredients and 2 1/2 cups flour.  Beat.  Heat milk and butter to 120 degrees (I use a candy thermometer).  Mix together with sugar mixture and beat 2 minutes.  Reserve 1 egg white.  Beat in 2 eggs and 1 yolk plus 2 1/2 cups flour.  Beat 2 minutes.  Stir in 3 cups flour.  Knead 10 minutes.  Add remaining flour as needed.  Put in greased bowl.  Raise 1 hour or until double.  divide and shape for wreaths or mounds, etc. Makes 2.  Cover and raise 1 hour.  Beat egg white and brush on top.  Bake at 325 degrees for approx. 25-30 minutes.  Tip – Dark trays will brown bottoms too quick.

AHHHH, Pasta!

Growing up in a large Italian family, pasta was the center of many meals.  Of course the meals started with a meat dish, but one of the things I am learning is that with a little bit of ingenuity you can make a complete meal out of pasta.  Adding a few small touches to your pasta will make all the difference.  As you will quickly find out, my two lovely daughters could live on nothing but pasta so you will see many different variations on this theme.

My first attempt is a recipe I found in Real Simple magazine (August 2008).  Pasta with Peppers and Mozzarella  (See full recipe at link)

Ingredients include pasta, olive oil, red bell peppers, garlic, arugula and fresh mozzarella

This is a pretty basic pasta recipe.  My children both love red peppers and mozzarella so I assumed this would be a big hit.  Unfortunately, things did not go as planned.  My oldest, who is 10, asks after her first bite if there are any nuts in this dish (she thinks she is allergic to nuts).  I assured her that there are no nuts.  After a few minutes she tells me her mouth feels itchy.  I have her stop eating the dish and get something else to eat.  My only thought is that she must be having an allergic reaction to the arugula.  Knowing how my husband has many allergies to weeds, that is my only guess.  Well, I gave her some Benedryl and everything worked out for her.  I don’t feel this dish fared very well, especially with our little arugula problem.  Adding the cheese to the hot pasta and pot made it get really melted and it clumped together with the arugula.  I found that I had to make a huge effort to get pieces of pepper, mozzarella and arugula with the pasta.  If I didn’t have all the different pieces with the pasta it did not have much flavor.  I think in general this is a good combo of flavors but it didn’t quite come together as I had hoped it would.  On a side note, my daughter, made some delicious garlic bagel toast!

Hello, my Name is vegforlife!

Just kidding, my real name is Jill!  This blog is a laid back place for me to talk about my experience with becoming a vegetarian and to share recipes, insights and fun with you.

Hope you enjoy!